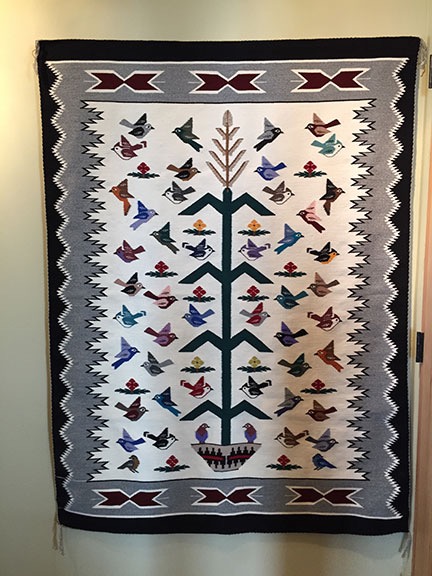
Okay, so, I’ve been wanting to do this for a while now, and today I finally got around to it. I’m talking about making my very own Navajo Tree of Life rug. Sounds fancy, right? It’s actually not as hard as you might think. But, first things first, I had to get a feel for what these rugs are all about.
I spent a good chunk of time browsing through pictures online, just getting inspired. Honestly, I was a little overwhelmed at first. There are so many beautiful designs! I saved a bunch of images that caught my eye, mostly from those home decor sites. They had some pretty cool stuff. I realized that a lot of these designs use wool, and the colors are just so vibrant and inviting. I wanted that same kind of energy in my rug.
Deciding on My Own Design
After a few days of just letting all these images marinate in my brain, I started sketching out some ideas. I knew I wanted to stick to the Tree of Life theme, but I also wanted to add my own little twist to it. Maybe some colors or patterns that I personally like. It was a bit of trial and error, but I eventually came up with a design I was really happy with.
Gathering My Materials
Now, this was the tricky part. I needed to get my hands on some good quality wool. I wanted to make sure it was soft and durable, but also had those awesome bright colors I saw in the pictures. I ended up ordering a bunch of different colored wool online from a few different places. It was kind of a gamble, but I figured I could always order more if I needed to. I also needed a loom, which, thankfully, I already had. It’s been gathering dust in the attic for years, so it was time to put it to good use!
Actually Making the Rug
- Warping the Loom: This was probably the most tedious part of the whole process. It took me a while to get the hang of it, but after a few hours, I had the loom all warped and ready to go.
- Weaving: This is where the magic happens! I started with the base colors, slowly adding in the different elements of my design. It was really cool to see the Tree of Life start to take shape.
- Adding the Details: Once the main part of the rug was done, I went back in and added all the little details. This is what really made the rug pop.
Finally Done!
It took me a few weeks, working on and off, but I finally finished my rug! I’m so proud of how it turned out. It’s not perfect, but it’s mine, and I think it looks pretty darn good. It’s got that handmade charm, you know? Plus, it really brightens up my living room. Definitely worth all the effort. It’s amazing what you can do with a little bit of wool and a whole lot of patience.
I’m already thinking about my next project. Maybe another rug, or maybe something completely different. Who knows? The possibilities are endless!


